DIY Craft Ideas For The Holidays
November 2nd, 2017
2821 Views
It's the most wonderful time of the year! or at least we can start thinking about it now that it's November. What better way to spend the holidays this year than getting crafty with the kids? DIY's are such a fun and creative way to spend weeks leading up to Christmas, they get the kids doing stuff and they keep them (relatively) quiet for some time (although, I cannot confirm how long!). From paper snowflakes that take 2 minutes to intricately designed Santa baubles that take hours, every kid (and adult for that matter) can't resist getting Christmas crafty! We've put together some craft idea that will rock your Christmas this year and shown you how to do them so everyone can get involved in the making process...
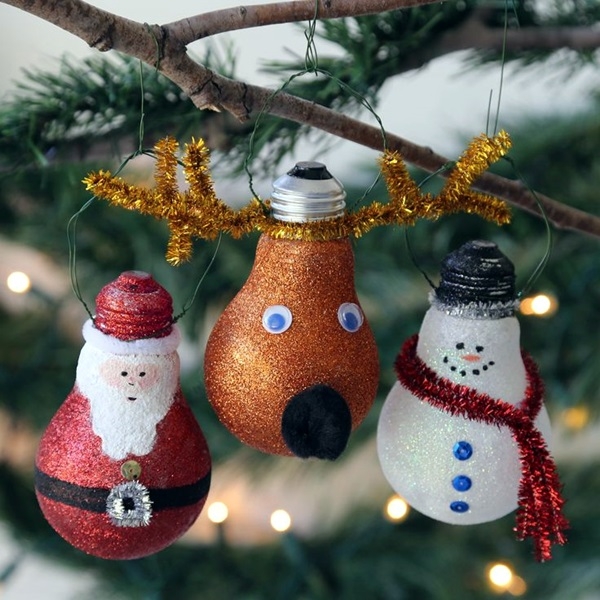
GLITTER LIGHT BULBS
What you will need:
- light bulbs
- glitter
- scissors
- string or cord
- paints
- PVA glue
- patience
- kids who don't moan every 5 mins
- time
- (maybe) sequins
- light bulbs
- glitter
- scissors
- string or cord
- paints
- PVA glue
- patience
- kids who don't moan every 5 mins
- time
- (maybe) sequins
These super cute glitter light bulbs look like amazing Christmas tree decorations and they're so easy to make. Buy some cheap lightbulbs and before anything crafty gets done, make sure they're not harmful. Cover it with PVA glue and then roll or sprinkle on the main glitter colour. After you've done this you'll need to wait for the glitter to dry (which will probably take around an hour depending on the glitter and glue you use). Get your paints and other craft bits out and decorate your heart out! For the finishing touches just add some string or cord so that you can display your Christmas crafts on the tree for everyone to see!
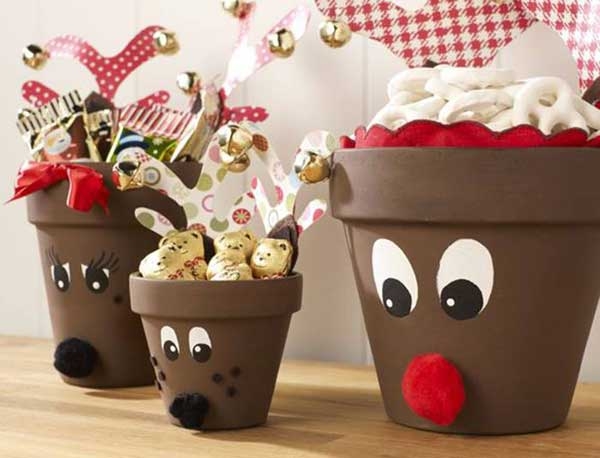
Reindeer plant pot presents
What you will need:
- plant pots (different sizes)
- paint
- pom poms
- the will to live
- felt
- glue (hot glue gun or just super glue will do)
- ear plugs (so you can't hear the screaming kids)
- coloured card
- plant pots (different sizes)
- paint
- pom poms
- the will to live
- felt
- glue (hot glue gun or just super glue will do)
- ear plugs (so you can't hear the screaming kids)
- coloured card
This crafty activity is great if you have some extra time and like to give your gifts in a cool and funky way! It's super simple too, they make great ornaments after you've done them if you don't want to give gifts in them. Get your plant pot (preferably plastic as they're lighter!) and paint the whole thing brown, after it dries you can add your details to it. Once the outside is done, use a hot glue gun or some super glue to stick felt on the inside so your presents look nice and cosy. Add some reindeer ears by cutting out a stencil with the coloured card and sticking them on the back of the pot. They look really good and everyone will appreciate your hard work!
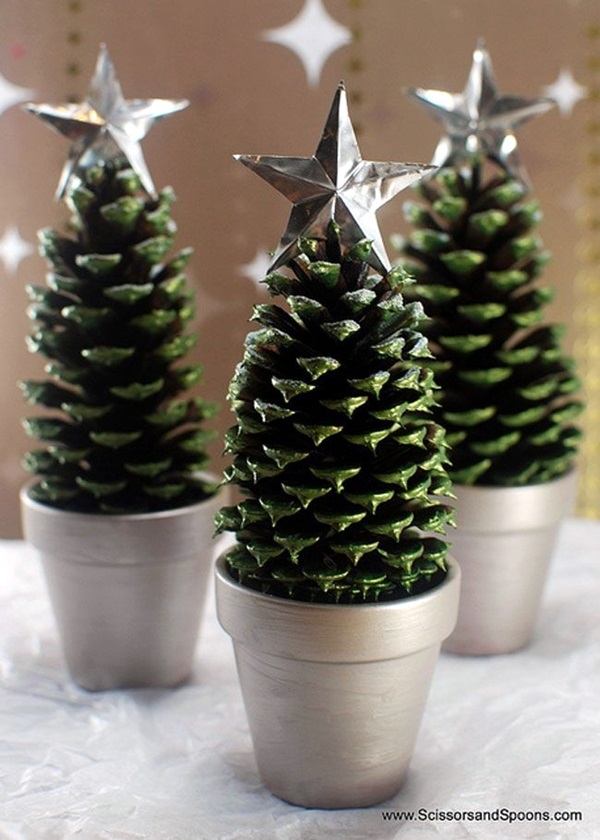
MINI CHRISTMAS TREE ORNAMENTS
What you will need:
- mini plant pots
- acorns
- spray paint (preferably green and silver)
- mini stars
- motivation
- glue
- mini plant pots
- acorns
- spray paint (preferably green and silver)
- mini stars
- motivation
- glue
Have you ever just wanted to spice up your room and make it super Christmassy but you can't afford to spend lots of money on decorations? We've found this great craft idea as a solution! Simply paint your plant pot and let it dry, then spray paint your acorn and wait for both to dry. Stick in your acorn and place a mini star on top and you've got yourself a gorgeous ornament that looks really effective and expensive but costs you virtually nothing!
SNOWY SNOW GLOBE
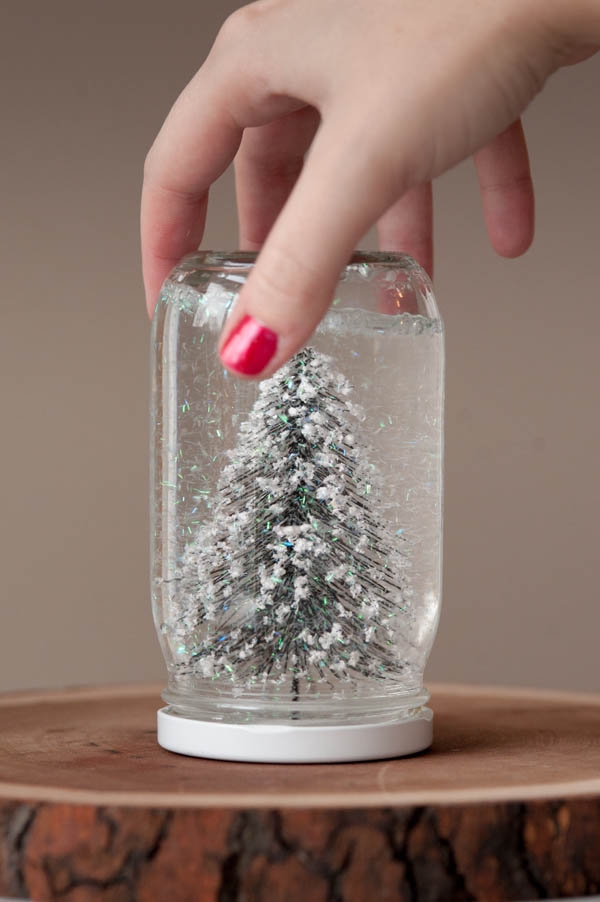
What you will need:
- mason jar (or just an empty jam jar)
- little Christmas figures
- water
- glitter ( a necessity!)
- the ability to multitask
- hot glue gun
- mason jar (or just an empty jam jar)
- little Christmas figures
- water
- glitter ( a necessity!)
- the ability to multitask
- hot glue gun
Who doesn't love a good snow globe? I absolutely love them and especially at this time of year, making your own is so easy and so much fun for those super cold days when all you want to do is snuggle up on the sofa and drink hot chocolate! Take your jar and wash it out, then attach your figure to the lid on the inside with a hot glue gun. After you've done this, put water and glitter into the main part of the jar and put glue around the inside of the lid and screw on. SHAKE SHAKE SHAKE! Then you've got a gorgeous snow globe!
Do you have any ideas or tips for getting crafty this Christmas? Share them with us!
Olivia x
